Sunday, March 22, 2009

Serious SL Meetup in Boulder

On March 19, 2009, I attended a Serious Second Life Meetup in Boulder in-world at the Alaskan Sandbox. This session was organized by Dr. Richard Hackthorn (RL) aka Hack Richards (SL), CEO of Bolder Technology Inc., and led by Eric Hackathorn (RL) aka Hackshaven Harford (SL), an electrical and computer engineer who works as a program manage at the National Oceanic and Atmospheric Administration (NOAA).

Participants of Serious SL Meetup in Boulder ( photo taken March 19/09)

I found out about the meetup through the SLED listserv and joined the group through Meetup
. In this session, Eric Hackathorn presented a curriculum for teaching, potential and new users of SL, some of the skills necessary to successfully participate in the 3D virtual world. The curriculum is organized into four topics including:
  1. Training Prerequisties - hardware/network requirements, download client, SL registration
  2. Basic Skills - movement, camera, exploration, communication, community, appearance
  3. Advanced Skills - Inventory, gadgets, HUD, economics, gestures, land, abuse, OpenSim
  4. Content Creation - building, texturing, scripting, particles, animations, vehicles, machinima
Eric Hackathorn developed the curriculum on a Moodle platform that is connected to SL through SLoodle and can be accesses at http://classroom.scilands.org/. SLoodle is a plugin that is added to Moodle in order to connect Moodle to the in-world activities of SL. I will provide some examples of how Eric Hackathorn makes this possible with the SciLands Classroom curriculum he has developed.

To teach the topic of movement in SL the student logs into the Moodle course to view the content. In the Moodle course the student will see the "Movement" topic with resources (text and video) including: Overview, Sitting, Mouse steering and Getting Fancy. To practice movement skills, the student will log into SL and go through a maze activity in-world.

In-word (SL) maze activity (photo retrieved from http://classroom.scilands.org/mod/assignment/view.php?id=113, March 19/09).

To practice camera controls, Eric Hackathorn included a topic in the Moodle course called "Camera Control." Again the student goes through resources, in the form of text and video, to learn about camera controls in SL. To practice camera skills the students complete an activity titled, "Schrodedinger's Box." In this activity students use their camera skills to look into a rezzed box. Once they are viewing what is inside the box, they are to take a picture and upload the image to the assignment location in Moodle.

Box to look into to see what is inside for the camera control activity (photo taken March 19/09)

From my perspective, this seems to be an effective way to teach new users skills in SL. It allows them to use the Moodle or LMS platform, which many are comfortable, to view the content and instructions and then go in-world to SL to practice what they have learned.


Thursday, March 12, 2009

Designing Your Future Workshop

On the evening of Thursday, March 12 at 9:00 P.M. I attended a workshop titled, Designing Your Future. This workshop was put on by TLE and instructed by Cathy Anderson-RL, who self declared herself as new to teaching in SL. The workshop was designed to help become familiar with tools necessary to better adjust to the future, make decisions and better understand how to become a futurist.

At this workshop I saw two new tools of interest to me. The first was a blue box sitting at the front of the room. As we came into the room, Cathy asked us to click on it to register our attendance.

Attendance Registration box (photo taken March 12/09)

The second tool Cathy used was called a "Bright Web Browser Screen." This tool allowed the group to view web pages in SL.

Bright Web Browser (photo taken March 12/09)

Tuesday, March 3, 2009

SLoodle Workshop

On Monday, March 2, 2009, I attended a Social Presence in Virtual Worlds (SLrl) workshop on SLoodle. This workshop was hosted in-world by Josmas Flores at Insula Docta TCD (slurl http://tinyurl.com/ddnypn). The workshop took place in a wonderful auditorium as shown below.

Auditorium on Insula Docta TCD (photo taken March 2/09)

Sloodle (Simulation Linked Object Oriented Dynamic Learning Environment) is a 3D online education system for SL that integrates with Moodle, an open-source CMS. The workshop presented some of the features of SLoodle including a Registration booth, Choice tool, Web-intercom and SLoodle HUD.

Since I am a Moodle user, I was very excited to see how the CMS interacted with SL. It must first be understood that we were in-world accessing the tools to interact with Moodle. To begin we had to register into the Moodle course by clicking on the SLoodle registration booth (left-booth shown in image below). This opened a new browser window to the registration page of the Moodle site it was connected to.
SLoodle Registration (left) and Enrolment (right) booths (photo taken March 2/09)

After completing the registration, through a confirmation email, I was able to enol into the course by clicking the enrolment booth (right-booth shown in image above). Viewable through my web-browser, this took me to the course located in Moodle. The purpose of registering and enroling from the in-world location was so that the connection could be made between SL and Moodle for the two to begin communicating.

Once registered and enroled into the Moodle course we were able to try some of the tools integrating the CMS with SL. The first one we looked at was the Choice tool which allows students to vote and see the results in either SL or Moodle. For example, we were asked to vote on what type of pizza we like with some participants voting in-world and others voting in the Moodle course. Participants were able to view the choice results from either the SL or Moodle environment.

The second tool we tried was the Web-intercom. A chat-room that brings a Moodle chat-room and SL chats together. When participants in SL text through local chat and Moodle participants text through the connected Moodle chat room, both groups can see the text chat.

The third tool we saw was the SLoodle HUD (Multi-function SLoodle Toolbar). This tool is described as enhancing the SL user-interface. When wearing the SLoodle HUD we were able to use a selection of classroom gestures, see a list of the Moodle user names from participating avatars or write entries directly into our Moodle blogs from SL.

One question individuals may have is...why do we want a virtual world, such as SL, to communicate with a CMS like Moodle? When we begin to look at some the items limiting access to SL we quickly see factors like high-end computer requirements and complicated interface emerge. By connecting SL with Moodle we allow lower-end computers and individuals who find the SL interface confusing to communicate with in-world participants through the Moodle environment.

Sunday, March 1, 2009

Further Analysis of Parcel Data Collection

The ECMM parcel will require tools to collect data that will be analyzed for both development and research purposes. Two of the tools I am considering to use in collecting statistics for the parcel are offered by Maya Realities and RabbitStats. The following information will describe each of the tools and provide details as to which proximity sensor was chosen for the ECMM parcel.

Maya Realities is a service company in SL, who began business in April 2007, focusing on analytics. For an Introduction to their services view the following slidecast.

Maya Realities offers a basic proximity sensor, among other more advanced solutions, for $L1 that collects basic land parcel information including number of unique avatars visiting, total time spent on a land parcel, and average time spent per avatar. To purchase a proximity sensor or find out more about their services visit their in-world office at
http://slurl.com/secondlife/Jingbo/67/35/30/

RabbitStats provides statistics on the following details of an SL property:
  • Identify and record names of visiting residents
  • Record length of time visitors spend on property
  • Record multiple visits
  • Stats provided through graphs and charts
  • Provides daily email listing property visitors
  • Premium account provides information to be downloaded as CSV file.
RabbitStats can be accessed from their in-world store located at http://slurl.com/secondlife/Tehama/104/203/24?title=Rabbit%20Glen. Pricing is separated into three account types:
  1. Basic - free
  2. Premium - L$5 per collector per day
  3. Non-Profit/Educational - free
After reviewing the information on each of the proximity sensors provided by both Maya Realities and RabbitStats, I was unsure as to which one to use. I therefore decided to try them both and come to a conclusion based on experience with both products. I will use the free options from both products to determine if one outperforms the other. Stay tuned for results...

Update... (March 8, 2009)
When looking for the proximity sensors from both Maya Realities and RabbitStats, I was only able to find the one from RabbitStats in-world. After looking around the Maya Realities in-world office, I was unable to locate any of the free versions of the sensor. I probably could have found out more information if I would have left a message at the Maya Realities' in-world office. The proximity sensor from RabbitStats was much easier to get in-world. I went to the SLURL for RabbitStats, mentioned above, and there was a free copy of the proximity sensor to take.

Free copy of RabbitStats proximity sensor (photo taken March 1, 2009)

The instructions, provided with the free version of the RabbitStats proximity sensor, made the setup process quite easy. Setup instructions direct you to the RabbitStats.com website to setup a new account. After the account is setup you enter in the code of your specific proximity sensor and it begins collecting data. The script of your specific sensor is placed into the contents folder of an object in the area in which you want to collect data. You can set the distance in which the proximity sensor collects data. You can then go to the domain name of your RabbitStats account to edit sensor setting, add more sensors, view data, and add more users to access the account. When the sensor is up and running it can be set to email reports to identified members.

Wednesday, February 25, 2009

Final Session - Evaluating a Presence in SL

The final session of the in-world, non-credit course, "Setting up an Educational Presence in SL" focused on evaluating your presence in SL. We looked at ways to assess the success of efforts in creating an educational presence in SL. This session was led by Maxito Ricardo (SL) Tom Peters (RL) who we quickly realized is an expert in evaluation and proximity sensor data collection.

The session began at the open air auditorium on Info Island (http://slurl.com/secondlife/Info%20Island/116/126/33) with a discussion on how to evaluate an institution's presence-building efforts in-world. Maxito started the discussion by explaining that many educational institutions, "are testing the waters to see if SL is another good way to pursue their overall mission...teaching, research service, etc.". Currently Maxito perceives institutions to be constructing spaces in SL. These virtual spaces are being used to hold events such as classes, lectures, symposia, social events and handle resources (create, collect, organize and distribute). He believes institutions hope their students (avatars) feel like they are part of the campus environment by trying to "recreate that campus feel." One of the benefits of the SL build space, Maxito explained, "it's much easier and cheaper in SL to build and reconfigure the built space to meet changing needs."

It was expressed that there is something about 3D virtual spaces that are very attractive to humans, however it takes collective efforts and time to understand new technologies. An interesting example of this was the development of the U of S interstate highway system. It was originally sold to officials as an instrument of national security. Troops needed to be able to move quickly in the event of a Soviet invasion. The interstate was not foreseen to assist in changing the entire urban landscape, creating a southwest population drift and changing the way people eat. With these types of unknown outcomes, Maxito believes, "one of the august responsibilities of any institution becoming active in SL is that they almost need to think about everything, from soup to nuts." Therefore when beginning to assess institutional presence-building in SL it is important to understand the focus of the effort. Is it to explore new ways of teaching and learning? Alternative ways to deliver distributed and distance education? Can it be used to attract prospective students or connect with alumni?

When it comes to assessment there are many things, in SL, that could be evaluated including buildings, grounds, teaching and learning tools, services, events, etc.. Maxito expressed, "I think that assessment here could be more important and useful than assessment in the real world." This is partly due to the fact that it is easier to make changes in SL but also, he believes, "the power to improve is much deeper in SL than in the real world." The ability to have decision-making power and implement change is a strong motivator for many individuals in SL. In RL there may be many factors (laws, bureaucracy, cost, etc.) that prevent an individual from being able to quickly implement desired change to their enviroment. Maxito believes this to be an advantage in SL, "Lots of people can move buildings on this island, for instance. Not many people have the decision-making power, technology, etc. in the real world to do that."

Three distinctions, Maxito mentioned, from real world assessment that may be useful in SL are provided by the 3-U's:
  1. Usability
  2. Use
  3. Usefulness
When we begin to look at the architecture in SL there are some wonderfully constructed objects. We see beautiful high-rise buidings, sky classrooms and underwater creations among other works of art. However, Maxito has used data, from proximity sensors, to research the use of space in SL and has generally found open air spaces and ground level floors of buildings receive the most traffic. Many of the unique spaces that are out of the way do not see much traffic. This may be something to consider when planning an SL build...if you want high traffic, build an open air space however, if you want private space where your group will not be interrupted, build it in an out of the way location.

Maxito identified further distinctions to be valid in SL between behaviour, attitudes and opinions. When evaluating behaviour we may look at where avatars go, what they do, what they touch and use. In evaluating attitudes and opinions we can begin to look into avatar's beliefs, what they are saying and how they may be feeling.

The group was presented with some evaluation methodologies currently being used in SL. Many of the methodologies used in RL to analyze and collect research data are currently being used in SL including surveys, focus groups and interviews.

Surveys in SL are a useful, convenient method to collect research data. However, as in RL, it is difficult to get individuals to complete surveys and in some instances the responses may be heavily weighted towards specific sub-groups . One of the benefits in creating surveys in SL is the creativity that can be designed into the survey. In a virtual world surveys can look much different than in RL. For example on Health InfoIsland, a survey was designed as a series of avatar-sized panels.

Focus groups and individual interviews can also be conducted in SL. Maxito believes these data collection methods work well because, "People tend to be very open and thoughtful here in SL."

A tool, in SL, that may be used to collect behvioural data on a parcel of land is a "proximity sensor." These tools allow 24/7 monitoring and analysis of raw traffic counts, avatar names, time spent in specific locations, objects touched, etc.. A couple of companies offering these products can be located at rabbitstats.com and www.mayarealities.com.

We teleported to Karuna, a grant funded island dedicated to AIDS awareness, to see some examples of proximity sensors. The sensors we saw were distributed around the island to assist in collecting data to evaluate their presence building efforts. Although the sensors are deployed around the island, the controls are placed in one location so the data can easily be harvested.

Proximity Sensor control cones (photo taken February 22/09)

The sensors used on Karuna Island are from Thomas Conover Products. Basic sensors are free of charge but ones more advanced can be purchased. Maxito explained that he finds these sensors easy to deploy, manage and harvest. Another aspect he found beneficial about these sensors is they can be set up so they don't cross parcel lines. If a sensor is placed near a location in a corner of a land parcel, it can be setup not to report on activity on the adjoining parcels. The reports produced for these specific sensors provided stats on number of avatars and how long they stayed on average.

Saturday, February 21, 2009

Session 2 - Setting Up Educational Presence

On February 8/09 I attended the second session of the workshop, Setting Up Educational Presence. The second session was led by Abbey Zenith.

The session began with a discussion in which one of the topics touched on prims. Abbey mentioned that prims may be what she described a "soft limit", where prim resources can be shared across parcels owned by the same group. This may be useful on the U of S property where parcels such as ECMM and Snellgrove Gallery can share the prim resources from the open area parcel.

We were then told how to check the prims on a parcel of land. This is done by right clicking an object > edit menu > general tab.

We learn't that prims on avatars do not count against the prims for a parcel of land...only the objects that are stationary count. Abbey mentioned that parcels do have avatar limits which are set for a sim...not a parcel. If you are on a parcel that shares space with other parcels on a sim, it is a good idea to let others know when you are planning a big event...anything over 15 people.

We then set out on a tour of ICT Library and the College of DuPage to see some examples of educational locations in SL.

The ICT Library, located on Info Island (
http://slurl.com/secondlife/Info%20Island/50/199/33/?title=Info%20Island), is a great place to get free educational tools, scripts and examples of class projects. During my visit, to ICT Library, I saw a couple items that may be integrated into the ECMM design. The first was a message board, which allows avatars to leave messages on a board. This could be very useful in a socializing area for communication and advertising purposes.

Message Board - ICT Library (photo taken February 8/09)

The second tool was a Holodeck Rooms created by Biscuit Carroll and Loki Clifton. The notecard information below clearly explains the details of the Holodeck Rooms. The benefit of this tool is the flexibility it provides to a parcel with limited space. We could use it on the ECMM parcel to have one region serve as a multi-purpose area that can be transformed into the desired scene as required.


TO USE THIS ROOM:
Go in, and then click on the vertical panel in the center of the room (white with green frame). This will give you a menu of possible rooms. Choose one!

From the brochure...
"The Holodeck allows you to store Second Life scenes and rez them from a menu whenever you want. The old scene is cleared and the new one appears. Scenes can include any prim objects including furniture, pose balls and particle generators. "

There are 3 types of holodecks by Carroll & Clifton:
  • L$0.00: A demo only [free] that has 5 scenes.
  • L$500: "Simple Holodeck." Allows you to add scenes created by others (good for 512 parcels).
  • L$9,000: "Production Holodeck." Allows you to make your own scenes and possiby earn commissions (allows scenes up to 134m x 134m to be built/rezzed). There is a reseller program available (IM Biscuit Carroll or Loki Clifton, or join the Holodeck support group).
Holodeck Rooms - ICT Library (photo taken February 8/09)

The second stop on our tour, of educational locations, was the College of DuPage (http://slurl.com/secondlife/Eduisland%203/194/69/23). Pipsqueak Fiddlesticks, a Librarian and Professor at the large community college in Illinois, was our host. One of the areas we visited is based on a literal interpretation of the poem "Tintern Abbey" by Wordsworth.

An overview of the immersive poem space is provided by teleporting up to a transparent platform. Avatars can walk around, as if they were walking on air, to view the area below.

Transparent platform - College of DuPage (photo taken February 8/09)

Information about the poem is provided through self-directed, discovery learning. As you walk around you come across interactive objects, when clicked provide activities and sound clips.

Interactive activity delivering object - College of DuPage (photo taken February 8/09)

One of the most interesting areas, from my perspective, was the "Read and Listen" station. When you sit down on one of the cushions your avatar receives a book to make you feel like you are relaxing and reading (it actually does provide a relaxing environment). When you click on the green apple you are provided with a download of an audio file and notecard of Wordsworth's "Tintern Abbey." When the audio file plays you listen to it and follow along on the note card.

Read and Listen station - College of DuPage (photo taken February 8/09)

Pipsqueak Fiddlesticks then took us to her sky classroom where she gathers with students. The sky classroom includes seating for avatars and separate screens that play slide presentations and videos.
Sky Classroom - College of DuPage (photo taken February 8/09)

During our visit to the College of DuPage we were introduced to an "Edu Rezzer." It operates much like a Holo Deck but appears to have some better functions. The Edu Rezzer is connected to an image database that allows you to create a variety of scenes. It requires very low prims...we were told it uses approximately 100 prims. When you walk away from the Edu Rezzer it de-rezzes and when you come back it remembers your last setting and re-rezzes. This would be very useful on a parcel with few prims available.

Edu Rezzer (open area scene) - College of DuPage (photo taken February 8/09)

Edu Rezzer (sitting area scene) - College of DuPage (photo taken February 8/09)

Pipsqueak Fiddlesticks designed and created the College of DuPage sim with one other person. Developing the space took two people approximately 80 hours. When asked about designing and planning...Pipsqueak believes that they planned too much, "we found that not planning much is better."

Sunday, February 1, 2009

Participating in "Setting Up an Educational Presence in SL" Course

Open air auditorium - Info Island (photo taken February 1/09)

I have enrolled and attended my first session of an in-world course titled, "Setting Up an Educational Presence in Second Life." This course is presented by the Illinois Alliance Library System and Graduate School of Library and Information Science (GSLIS).

The non-credit course consists of four sessions offered on Sundays, February 1, 8, 15 and 22 from 6:00 - 8:00 P.M. (4:00 - 6:00 P.M. SL time). The course is to cover objectives such as planning, needs assessment, goals, expectations, buying and renting land, where to find help, prefab vs. building, challenges, positives, teaching tools in SL such as Power point, class management, groups permissions, communication, and evaluating your presence once you have it set up. I haven't evaluated my presence in real life, let alone a second life. :-)

Instructors for this course are Lori Bell (Lorelei Junot-SL), Rhonda Trueman (Abbey Zenith-SL) and Tom Peters (Maxito Ricardo-SL). Each week is organized to cover the following:
  • Week One - Planning a presence in Second Life
  • Week Two - Setting up a presence in Second Life
  • Week Three - Managing a presence in Second Life
  • Week Four - Evaluating a presence in Second Life
When I first saw this course being offered, I was amused at the title, "Setting Up an Educational Presence in Second Life." Mainly because of the resemblance to the title of this blog, "Path to Developing a Presence in Second Life." Maybe there are some royalties here? :-)

For the first week session we gathered at the open air auditorium on Info Island
http://slurl.com/secondlife/Info%20Island/116/126/33. Lori Bell ((Lorelei Junot-SL), who is the Director of Innovation for the Alliance Library System, led the first class session on planning a presence in Second Life.

The first session went very smoothly, voice (along with some text) was used for communication and worked quite flawless. Lori began the session with a short discussion on virtual worlds, identifying alternatives to SL. Resources including the Second Life Education Wiki (http://www.simteach.com/wiki/index.php?title=Second_Life_Education_Wiki) and Second Life Educators (SLED) listserv (https://lists.secondlife.com/cgi-bin/mailman/listinfo/educators) were identified as useful locations for information on SL.

We toured three locations in SL including Bradley University, Land of Lincoln and Bradburyville to view and learn about the design and setup of their space. At Bradley University we met Puglet Dancer, who teaches Second Life 101 and 201 and is the Director of the Library. The SIM is ran by a team of 1 IT/computer person, 4 Librarians and 1 student. Bradley University was created in 2006 through a grant to explore the possibilities of virtual worlds. Skyboxes, including viewers, are available to students that consist of 150 prims for them to develop building skills. The SIM is designed based on the campus colleges. Each college is represented by a kiosk including information on each college at the university. An interesting build on the campus is a Shinto Shrine. This shrine is used for religious studies and allows individuals to experience the shrine without seeing it in real life. The student centre includes games such as pool, air hockey and monopoly. Live concerts are held at the student centre with a dance floor on the rooftop. Puglet Dancer describes the learning curve of SL to be a huge obstacle in getting participation from faculty and staff. She also expressed that administration is concerned about people sitting in on classes without paying fees.

Land of Lincoln, the second location of our tour, is designed based on the topic of Abraham Lincoln. At this SIM we met Daisyblue Hefferman who is a Reference Librarian. The SIM or land was donated but the rest of the work was completed by volunteers. Some of the exhibits on the SIM include a plantation, slave quarters, army quarters, slavery interactive web tours, web-based resources and welcome centre including free outfits, events information and abiltiy to join the events group. Daisyblue Hefferman identified that preplanning a build is important and should include goals and objectives of the space.

The third location we visited was Bradburyville, a SIM designed and built based on books. This is a project funded by an arts grant and constructed by a team of four, working on individual builds. The build we looked at was a virtual reality book based on Fahrenheit 451 by Ray Bradbury. This was an interactive book that you walked into to experience the events of the story.

Virtual Reality Book - Bradburyville (photo taken February 1/09)

Next week we will be looking at setting up a presence in SL.


Sunday, January 18, 2009

University of KY Island - Public Policy

The University of Kentucky created an inland in SL called University of KY Island. They have developed an Island Policy, I believe to be thorough and well written. The policy covers areas that address:
  • purpose in which island is used (education and research of SL)
  • contact information
  • tracking of avatars for research purposes
  • island rating
  • rules and regulations

I believe this to be a nice introduction to their space. Providing visitors with necessary information to better understanding the purpose, rules and regulations of the island.

898.3 Special Topics Course

For this term, in my graduate studies at the U of S, I have been approved for a 898.3 Special Topics course titled, Exploring Pedagogicial Strategies for Multi-User Virutal Environments.

This course is designed to examine potential strategies for optimizing instruction within a Multi-User Virtual Environment (MUVE), specifically Second Life (SL). Areas of interest and investigation for this course include:
  • Strategies for designing virtual learning environments (VLEs) in the MUVE, Second Life.
  • General methods of pedagogy used within the MUVE, Second Life.
  • Specific instructional strategies and tools used in the MUVE, Second Life.

The course will be divided into three phases. The first phase will explore the three main areas of interest outlined above and will document instructional strategies currently being used in SL. The second phase will attempt to understand and interpret these findings (methods, strategies) through the lens of instructional theory and design methodology. The third phase will include applying what has been learned in the development of training sessions for the U of S faculty, staff and students in the use of SL.

Sunday, December 21, 2008

Redesign of ECMM Space

The U of S space in Second Life has been successfully subdivided into three parcels. The three parcels include space for the Snellgrove Gallery, ECMM, and general space for the U of S (shown in image below). The purpose of the subdivision is so each parcel can be controlled individually. Media streaming and building permissions are just some of the items that can now be controlled separately for each parcel.

Subdivision of U of S space on Teaching 6 (photo taken December 21/08)

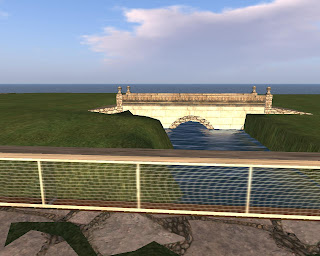
The redesign of the ECMM parcel has begun with the addition of a river, bridge and safety fence (shown in image below). When entering the ECMM parcel from the general U of S parcel you will now walk across a stone bridge over a river. This river is built on the property line separating the ECMM parcel from the general U of S parcel. It would be great if we could come up with a name for the bridge and river!

River, bridge and fence separating ECMM and general U of S parcels (photo taken December 21/08)

For the redesign of the ECMM parcel, we are considering a more open atmosphere design. This means we may not see the resurrection of the ECMM building. However we may incorporate many of the spaces including meeting area, teaching and learning area and multimedia area into a more open area design.

To redesign this space we are are going to take more of a structured design approach. We will first complete a front end analysis of the space including a needs assessment, potential educational activities, and potential learners. The next stage of development will include a design strategy resulting in a blue print, identifying a design plan. We understand the needs of this space will change, however we are interested in coming up with a base or starting point flexible enough to be manipulated to meet a variety of needs.

Wednesday, September 10, 2008

Session 7: Promoting Interactivity

The objectives for session 7 were to:
  • Identify builidng projects that support interactivity in learning.
  • Associate capabilities of interactivity builds with appropriate pedagogical objectives.

To begin the class Mali Young started a camp fire and asked us to change our environment to midnight. This was done to provide atmosphere and to set a mood, and it actually worked. Mali expressed that building and creating a mood helps to motivate learners. We were also told that including aspects of playfulness are important in motivating learners.

One of the basic, fun ways to incorporate interactivity in SL is to make a live survey. Questions can be asked through powerpoint slides or textures applied to a media screen or prim. Participants can have different colored cards that they wear to provide their answers. We participated in a live survey, and to begin a large media screen was rezzed to view the powerpoint survey questions. Each student then clicked a prim (box) to receive the colored cards used to identify their answers. Questions were then provided to us on the screen and we presented our answers by wearing colored cards. This type of activity is useful for live formative assessment and is known to build cohesiveness within a group.

Another useful tool designed for interactivity is a suggestion box, also known as a feedback box, hand-in box, or survey collector. These tools allow for information to be collected for purposes such as quizzes, surveys, homework or any other type of information needed to be collected. Surveys can also be done through web-based survey tools like Survey Monkey. To do this the survey URL giver is put into a prim with the URL of the survey. When the prim is clicked it provides an option to load the survey in an external web-browser.

Walk through tutorials are another way to incorporate interactivity. A great example of a walk through tutorial is The Particle Laboratory http://slurl.com/secondlife/Teal/180/70/21. It is designed to take you through a step by step process of adding particle textures to prims. ED Tech Island http://slurl.com/secondlife/EdTech/214/56/26 was originally setup to study social persistence in a SIM. Some of the Island's research focuses on how to promote or keep individuals on a SIM. Design methods such as creating pathways, putting information along pathways, creating community groups and sending out group notices have been used to control traffic on the SIM. A fantastic example of a walk through tutorial is Thursday' Fiction http://slurl.com/secondlife/Esperance/239/41/22/?title=Thursday%27s%20Fiction, based on a movie and book of the same title. It is still under construction but what has been created is an amazing experience, although disturbing at times.


Saturday, August 23, 2008

Session 6: Student Projects 1- Providing Information

The theme for session 6 was providing information to learners in SL. We began by discussing 5 common ways to provide information to learners in SL.
  1. Slide shows
  2. Textured prim with notecard
  3. URL provider (to open web pages)
  4. Books
  5. Video
Mali Young had some interesting comments on the URL provider. She explained that we are now able to bring the 2D web (such as blogs) into the 3D web. This is a powerful concept because Second Life now becomes the "web plus" (Young, 2008).

We had some very interesting building projects in this session. The first was a URL provider that launched to a web page. This type of tool provides the ability for instruction to be provided to learners without having to leave SL. To make this project we first rezzed a cube and sized it to look like a screen. We then put the URL provider script into the object content folder of the cube. The script then needed to be modified by replacing the current URL with the one we wanted. After everything was setup, when we clicked on the screen it provided a URL and opened up a web page in a new window. The neat thing about this project is that any texture or object can launch the webpage. For example the object could look like a large screen with a texture of the webpage or the object could be a computer that you sit at and get the URL. People are being very creative when providing URLs in-world.

The next project was making a power point presentation. To do this we again rezzed a cube and turned it into a large screen. We then put a script that only allowed the owner to advance the slides. There is also another script that allows anyone to advance the slides. We then imported some slides and put them into the contents folder of the screen (cube). It is a good idea to number your slides because the script will put them in order according to the numbers.

We then looked at a product called a Thincbook. This is a book in SL that you can add your own content. I am not going to go into this in-depth because I believe that I discussed this item in a previous entry.

The project that I was most excited about was the Media screen. This is probably due to the fact that I have been wanting to try out media since the construction of the ECMM building. I have not been able to test media out on the U of S property due to permission issues that need to be rectified. So I was finally able to test it out...and all I can say is fun...fun...fun. As you can see in the image below, I created a media screen in my sky-saucer. I added some relaxing chairs so I can sit down and watch some Eagles music videos that I set to stream in from Youtube.


Jeff's newly created "Sky-saucer" with mutli-media screen (photo taken August 23/08)

The easiest way to learn how to make a media screen is to watch the following two videos by Torley Linden.
  1. http://youtube.com/watch?v=-SJu23Ya4WY

  2. http://www.youtube.com/watch?v=7AUwIUDW7LM

Thursday, August 21, 2008

Construction Junction Session 5: Sky Building

Session 5 of the Construction Junction workshop introduced us to Sky Building. This simply means to build objects that are positioned above your land in the sky. An example of this is a Sky Box which is some type of platform situated in the sky that can be used as extra space for building, classroom or meeting space.

Our first objective for this session was to discuss purposes for sky building. Some of the reasons for sky builds that came out of this discussion were privacy, increase building space, get away from griefers or people on the ground and allows for division of space (e.g. space divided into content areas/social areas/building areas).

Mali Young then explained to us that privacy in virtual environments like SL is an illusion and that there really is no privacy in SL. Even when communicating in SL there is no privacy unless talking to someone through instant messaging. One question that I have in the privacy issue is, can I not set my land to not allow visitors unless invited? I visited NAIT's (Northern Alberta Institue of Technology) location in SL and I was allowed into the visiting area but I was not allowed into their main campus location. I see this as being able to providing some level of privacy and control as to who can visit your property, if so desired.

The second objective of session 5 was to design and build in the sky. To build above 200 meters in the sky, avatars must wear what are called flight or Ninja feathers. Without these feathers avatars cannot fly higher than 200 meters, however with the feathers avatars can exceed this limit. We learned that most sky builds are between 250 meters and 750 meters. The reason for going above 250 meters is to get out of sight range of people on the ground.

We then completed our first building project for this session, a sky build. To build in the sky you must have a platform to work from. We simply rezzed a cube and sat on it. We then raised it into the sky to approximately 500 meters. At this point we rezzed another cube and stretched it into a platform to stand on. This was the platform from which we would be able to build. Mali then asked us to mark down our coordinates, of the platform, so we could use them for our next project...the teleport system.

We then moved into our final objective and building project for the session...creating a teleport system between two locations. It was explained to us that there are many teleport options and scripts. This includes ones that teleport between 2 locations, between 3 or more locations, across SIMS, etc. The one we used allowed us to teleport between 2 locations. To create it we put the teleport script into the contents folder of the first object or prim located on the lower level. We then modified the script on the lower level teleport with the coordinates of the upper level platform. We then teleported to the upper platform and added the teleport script to the contents folder. We then modified the script by adding the coordinates of the lower platform or prim. One problem that a few of us ran into was not having the proper coordinates for our platform. A couple of times I teleported to open air and fell to the ground. I finally entered the proper coordinates to my platform, into the teleport script, and everything worked fine.

Construction Junction participants working on teleport systems. (photo taken August 19/08)

Thursday, August 14, 2008

Construction Junction Session 4: Integrating Scripst, Sounds and Animations into Your Builds

Session 4 of the Construction Junction workshop, again presented some new educational tools and taught some interesting new skills. The tool that we were introduced to was the Speak-Easy HUD. I may have mentioned it previously but during this session Mali Young provided each of us with one of the HUDS and showed us how it works. Some of the skills that we were taught dealt with scripts, audio clips, animations, and building.

The Speak Easy is a tool that creates a heads up display (HUD) when you wear it. It's purpose is to read text from a notecard and display the text in public chat, as if you were typing it in. This is a huge time saver when you have text that needs to by provided to a group and you do not have time to type it out. Our instructor from the Construction Junction workshop, Mali Young uses this HUD when she is providing instructions on a specific task. I find it very useful because the directions are clearly displayed and a history is available if needed.

The fist project that we created in this session was a student greeter. This is a useful tool that greets and provides objects to visitors when clicked. We first created a cube and put a texture onto it (I used my picture as a texture). For the student greeter to play sounds and give objects we needed to insert scripts into the contents folder of the object. The two scripts were the Play Sound Once script and the Notecard Giver script. A few simple modifications were required for our items to work with these scripts in our student greeter. I then added a 10 second audio clip (.wav), that I recorded in Audacity, to the contents of the object. This allowed for the audio clip to play when the object is clicked (very cool). The final item added to the contents of the student greeter was a welcome notecard. When clicked, the student greeter now played the audio file and handed out a welcome notecard.


Student Greeter created by Jeff Kurka. (photo taken August 14/08)


The second project we made during session 4 was a Rock that played sounds. This object is useful when you want sounds like birds or water playing in the background. We first made a rock from a sculpty prim. This is one prim that is sculpted into a shape to represent an object. A rock texture was then added to the object. Five bird audio files (.wav) were then added to the object contents. To make the sounds play a script called Sound (Random-string of same names) was added to the object contents. Again some simple modifications of the script were required to play the audio files that were added.


Rock that plays bird sounds (photo taken Aug. 14/08).


The third project for this session was a scripted ice cream cone. To make this object we first created the cone and then created the ice cream. The two objects were then linked so animations could be added. Before the animations, we added a script called Animator to the object contents. We then added two animations, one called ice cream eat and one called ice cream hold.


Ice cream anyone?(photo taken Aug. 14/08)

Wednesday, August 13, 2008

Construction Junction Session 3: Building Supplies and Groups

Our third session of the Construction Junction workshop showed me how little I know about building in SL. We began the session looking at a tool called a Prim Finder or Rezzer (shown below).


Mali Young, Jeff Kurka and other Construction Junction participants learning about a Prim Finder/Rezzer. (photo taken August 12/08).
A Prim FInder/Rezzer is a very useful tool that allows you to search through a variety of prim shapes and choose the one you would like to use. This is useful because you do not necessarily have to know how to create the shapes in order to build items out of the prim shapes the rezzer provides. Mali said that one can be purchased for approximately 250 Linden which comes out to about $1.00.

Our next agenda item was to play a game called
primtionary, which is a SL game that helps to develop and refine your building skills. The host IM's an object to be created by one of the game participants. That participant tries to construct the object out of prims while other members try to guess what the object is supposed to be. Once someone guesses...they win 20 Lindens and then get their turn at building.


The Construction Junction group playing
primtionary. (photo taken August 12/08).

In the past I have always struggled moving around objects in my inventory. As I am moving items from folder to folder, I have folders expanding and collapsing which make it difficult to put items exactly where you want them. Well Mali taught us a trick when working with inventory items. All you have to do is go into file>open new window and a second inventory window opens allowing you to drag and drop items much easier. Mali provided us with this tutorial by Torley Linden to view to help understand the process: http://www.youtube.com/watch?v=z19DHCrQVIM

Another trick we were shown is how to use inventory filters to find items in our inventory. Take a look at the following Torley Linden video to help understand the process:
http://youtube.com/watch?v=XLpcjhbQRdc

Our building project for this session was a material dispenser. It is a very useful object that has a script allowing it to give out items. For example I can put notecards, landmarks or other objects into it and when someone clicks on the dispenser it will give out the items. Mail uses it to give out all our supplies for each session. I put the latest version of the ECMM t-shirt into the dispenser and I might use it to give out the t-shirt. Shown below is the updated version of the ECMM t-shirt.


Updated version of the ECMM t-shirt
. (photo taken August 12/08).

Although this was a very informative and well organized session, I believe people are having difficulties understanding what chat to use. For example when I first arrived at the sky box we were using local voice chat. We were told to go over to group voice chat which worked fine. Many of the group members were initially using local text chat during primtionary but then the chat seemed to switch over to group text chat. This was confusing for some of us as we were trying to figure out what text chat we were to be using. Also when the speak easy HUD was used, the text chat transferred back to the local text chat. This was a little confusing for some as they did not know where to look for the instructions coming from the speak easy HUD. I understand certain chats need to be used for certain tools or in specific situations but it seems to be necessary to identify when chats are switched from local to group or vice versa.