Sunday, December 21, 2008

Redesign of ECMM Space

The U of S space in Second Life has been successfully subdivided into three parcels. The three parcels include space for the Snellgrove Gallery, ECMM, and general space for the U of S (shown in image below). The purpose of the subdivision is so each parcel can be controlled individually. Media streaming and building permissions are just some of the items that can now be controlled separately for each parcel.

Subdivision of U of S space on Teaching 6 (photo taken December 21/08)

The redesign of the ECMM parcel has begun with the addition of a river, bridge and safety fence (shown in image below). When entering the ECMM parcel from the general U of S parcel you will now walk across a stone bridge over a river. This river is built on the property line separating the ECMM parcel from the general U of S parcel. It would be great if we could come up with a name for the bridge and river!
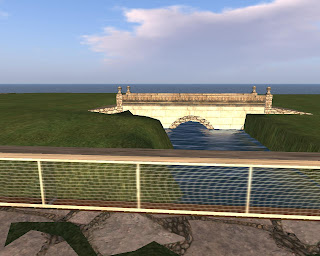
River, bridge and fence separating ECMM and general U of S parcels (photo taken December 21/08)

For the redesign of the ECMM parcel, we are considering a more open atmosphere design. This means we may not see the resurrection of the ECMM building. However we may incorporate many of the spaces including meeting area, teaching and learning area and multimedia area into a more open area design.

To redesign this space we are are going to take more of a structured design approach. We will first complete a front end analysis of the space including a needs assessment, potential educational activities, and potential learners. The next stage of development will include a design strategy resulting in a blue print, identifying a design plan. We understand the needs of this space will change, however we are interested in coming up with a base or starting point flexible enough to be manipulated to meet a variety of needs.

Wednesday, September 10, 2008

Session 7: Promoting Interactivity

The objectives for session 7 were to:
  • Identify builidng projects that support interactivity in learning.
  • Associate capabilities of interactivity builds with appropriate pedagogical objectives.

To begin the class Mali Young started a camp fire and asked us to change our environment to midnight. This was done to provide atmosphere and to set a mood, and it actually worked. Mali expressed that building and creating a mood helps to motivate learners. We were also told that including aspects of playfulness are important in motivating learners.

One of the basic, fun ways to incorporate interactivity in SL is to make a live survey. Questions can be asked through powerpoint slides or textures applied to a media screen or prim. Participants can have different colored cards that they wear to provide their answers. We participated in a live survey, and to begin a large media screen was rezzed to view the powerpoint survey questions. Each student then clicked a prim (box) to receive the colored cards used to identify their answers. Questions were then provided to us on the screen and we presented our answers by wearing colored cards. This type of activity is useful for live formative assessment and is known to build cohesiveness within a group.

Another useful tool designed for interactivity is a suggestion box, also known as a feedback box, hand-in box, or survey collector. These tools allow for information to be collected for purposes such as quizzes, surveys, homework or any other type of information needed to be collected. Surveys can also be done through web-based survey tools like Survey Monkey. To do this the survey URL giver is put into a prim with the URL of the survey. When the prim is clicked it provides an option to load the survey in an external web-browser.

Walk through tutorials are another way to incorporate interactivity. A great example of a walk through tutorial is The Particle Laboratory http://slurl.com/secondlife/Teal/180/70/21. It is designed to take you through a step by step process of adding particle textures to prims. ED Tech Island http://slurl.com/secondlife/EdTech/214/56/26 was originally setup to study social persistence in a SIM. Some of the Island's research focuses on how to promote or keep individuals on a SIM. Design methods such as creating pathways, putting information along pathways, creating community groups and sending out group notices have been used to control traffic on the SIM. A fantastic example of a walk through tutorial is Thursday' Fiction http://slurl.com/secondlife/Esperance/239/41/22/?title=Thursday%27s%20Fiction, based on a movie and book of the same title. It is still under construction but what has been created is an amazing experience, although disturbing at times.


Saturday, August 23, 2008

Session 6: Student Projects 1- Providing Information

The theme for session 6 was providing information to learners in SL. We began by discussing 5 common ways to provide information to learners in SL.
  1. Slide shows
  2. Textured prim with notecard
  3. URL provider (to open web pages)
  4. Books
  5. Video
Mali Young had some interesting comments on the URL provider. She explained that we are now able to bring the 2D web (such as blogs) into the 3D web. This is a powerful concept because Second Life now becomes the "web plus" (Young, 2008).

We had some very interesting building projects in this session. The first was a URL provider that launched to a web page. This type of tool provides the ability for instruction to be provided to learners without having to leave SL. To make this project we first rezzed a cube and sized it to look like a screen. We then put the URL provider script into the object content folder of the cube. The script then needed to be modified by replacing the current URL with the one we wanted. After everything was setup, when we clicked on the screen it provided a URL and opened up a web page in a new window. The neat thing about this project is that any texture or object can launch the webpage. For example the object could look like a large screen with a texture of the webpage or the object could be a computer that you sit at and get the URL. People are being very creative when providing URLs in-world.

The next project was making a power point presentation. To do this we again rezzed a cube and turned it into a large screen. We then put a script that only allowed the owner to advance the slides. There is also another script that allows anyone to advance the slides. We then imported some slides and put them into the contents folder of the screen (cube). It is a good idea to number your slides because the script will put them in order according to the numbers.

We then looked at a product called a Thincbook. This is a book in SL that you can add your own content. I am not going to go into this in-depth because I believe that I discussed this item in a previous entry.

The project that I was most excited about was the Media screen. This is probably due to the fact that I have been wanting to try out media since the construction of the ECMM building. I have not been able to test media out on the U of S property due to permission issues that need to be rectified. So I was finally able to test it out...and all I can say is fun...fun...fun. As you can see in the image below, I created a media screen in my sky-saucer. I added some relaxing chairs so I can sit down and watch some Eagles music videos that I set to stream in from Youtube.


Jeff's newly created "Sky-saucer" with mutli-media screen (photo taken August 23/08)

The easiest way to learn how to make a media screen is to watch the following two videos by Torley Linden.
  1. http://youtube.com/watch?v=-SJu23Ya4WY

  2. http://www.youtube.com/watch?v=7AUwIUDW7LM