Sunday, December 21, 2008

Redesign of ECMM Space

The U of S space in Second Life has been successfully subdivided into three parcels. The three parcels include space for the Snellgrove Gallery, ECMM, and general space for the U of S (shown in image below). The purpose of the subdivision is so each parcel can be controlled individually. Media streaming and building permissions are just some of the items that can now be controlled separately for each parcel.

Subdivision of U of S space on Teaching 6 (photo taken December 21/08)

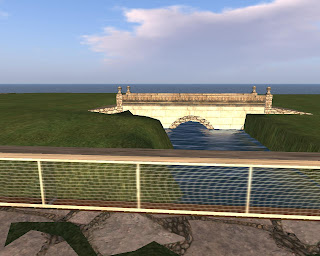
The redesign of the ECMM parcel has begun with the addition of a river, bridge and safety fence (shown in image below). When entering the ECMM parcel from the general U of S parcel you will now walk across a stone bridge over a river. This river is built on the property line separating the ECMM parcel from the general U of S parcel. It would be great if we could come up with a name for the bridge and river!

River, bridge and fence separating ECMM and general U of S parcels (photo taken December 21/08)

For the redesign of the ECMM parcel, we are considering a more open atmosphere design. This means we may not see the resurrection of the ECMM building. However we may incorporate many of the spaces including meeting area, teaching and learning area and multimedia area into a more open area design.

To redesign this space we are are going to take more of a structured design approach. We will first complete a front end analysis of the space including a needs assessment, potential educational activities, and potential learners. The next stage of development will include a design strategy resulting in a blue print, identifying a design plan. We understand the needs of this space will change, however we are interested in coming up with a base or starting point flexible enough to be manipulated to meet a variety of needs.

Wednesday, September 10, 2008

Session 7: Promoting Interactivity

The objectives for session 7 were to:
  • Identify builidng projects that support interactivity in learning.
  • Associate capabilities of interactivity builds with appropriate pedagogical objectives.

To begin the class Mali Young started a camp fire and asked us to change our environment to midnight. This was done to provide atmosphere and to set a mood, and it actually worked. Mali expressed that building and creating a mood helps to motivate learners. We were also told that including aspects of playfulness are important in motivating learners.

One of the basic, fun ways to incorporate interactivity in SL is to make a live survey. Questions can be asked through powerpoint slides or textures applied to a media screen or prim. Participants can have different colored cards that they wear to provide their answers. We participated in a live survey, and to begin a large media screen was rezzed to view the powerpoint survey questions. Each student then clicked a prim (box) to receive the colored cards used to identify their answers. Questions were then provided to us on the screen and we presented our answers by wearing colored cards. This type of activity is useful for live formative assessment and is known to build cohesiveness within a group.

Another useful tool designed for interactivity is a suggestion box, also known as a feedback box, hand-in box, or survey collector. These tools allow for information to be collected for purposes such as quizzes, surveys, homework or any other type of information needed to be collected. Surveys can also be done through web-based survey tools like Survey Monkey. To do this the survey URL giver is put into a prim with the URL of the survey. When the prim is clicked it provides an option to load the survey in an external web-browser.

Walk through tutorials are another way to incorporate interactivity. A great example of a walk through tutorial is The Particle Laboratory http://slurl.com/secondlife/Teal/180/70/21. It is designed to take you through a step by step process of adding particle textures to prims. ED Tech Island http://slurl.com/secondlife/EdTech/214/56/26 was originally setup to study social persistence in a SIM. Some of the Island's research focuses on how to promote or keep individuals on a SIM. Design methods such as creating pathways, putting information along pathways, creating community groups and sending out group notices have been used to control traffic on the SIM. A fantastic example of a walk through tutorial is Thursday' Fiction http://slurl.com/secondlife/Esperance/239/41/22/?title=Thursday%27s%20Fiction, based on a movie and book of the same title. It is still under construction but what has been created is an amazing experience, although disturbing at times.


Saturday, August 23, 2008

Session 6: Student Projects 1- Providing Information

The theme for session 6 was providing information to learners in SL. We began by discussing 5 common ways to provide information to learners in SL.
  1. Slide shows
  2. Textured prim with notecard
  3. URL provider (to open web pages)
  4. Books
  5. Video
Mali Young had some interesting comments on the URL provider. She explained that we are now able to bring the 2D web (such as blogs) into the 3D web. This is a powerful concept because Second Life now becomes the "web plus" (Young, 2008).

We had some very interesting building projects in this session. The first was a URL provider that launched to a web page. This type of tool provides the ability for instruction to be provided to learners without having to leave SL. To make this project we first rezzed a cube and sized it to look like a screen. We then put the URL provider script into the object content folder of the cube. The script then needed to be modified by replacing the current URL with the one we wanted. After everything was setup, when we clicked on the screen it provided a URL and opened up a web page in a new window. The neat thing about this project is that any texture or object can launch the webpage. For example the object could look like a large screen with a texture of the webpage or the object could be a computer that you sit at and get the URL. People are being very creative when providing URLs in-world.

The next project was making a power point presentation. To do this we again rezzed a cube and turned it into a large screen. We then put a script that only allowed the owner to advance the slides. There is also another script that allows anyone to advance the slides. We then imported some slides and put them into the contents folder of the screen (cube). It is a good idea to number your slides because the script will put them in order according to the numbers.

We then looked at a product called a Thincbook. This is a book in SL that you can add your own content. I am not going to go into this in-depth because I believe that I discussed this item in a previous entry.

The project that I was most excited about was the Media screen. This is probably due to the fact that I have been wanting to try out media since the construction of the ECMM building. I have not been able to test media out on the U of S property due to permission issues that need to be rectified. So I was finally able to test it out...and all I can say is fun...fun...fun. As you can see in the image below, I created a media screen in my sky-saucer. I added some relaxing chairs so I can sit down and watch some Eagles music videos that I set to stream in from Youtube.


Jeff's newly created "Sky-saucer" with mutli-media screen (photo taken August 23/08)

The easiest way to learn how to make a media screen is to watch the following two videos by Torley Linden.
  1. http://youtube.com/watch?v=-SJu23Ya4WY

  2. http://www.youtube.com/watch?v=7AUwIUDW7LM

Thursday, August 21, 2008

Construction Junction Session 5: Sky Building

Session 5 of the Construction Junction workshop introduced us to Sky Building. This simply means to build objects that are positioned above your land in the sky. An example of this is a Sky Box which is some type of platform situated in the sky that can be used as extra space for building, classroom or meeting space.

Our first objective for this session was to discuss purposes for sky building. Some of the reasons for sky builds that came out of this discussion were privacy, increase building space, get away from griefers or people on the ground and allows for division of space (e.g. space divided into content areas/social areas/building areas).

Mali Young then explained to us that privacy in virtual environments like SL is an illusion and that there really is no privacy in SL. Even when communicating in SL there is no privacy unless talking to someone through instant messaging. One question that I have in the privacy issue is, can I not set my land to not allow visitors unless invited? I visited NAIT's (Northern Alberta Institue of Technology) location in SL and I was allowed into the visiting area but I was not allowed into their main campus location. I see this as being able to providing some level of privacy and control as to who can visit your property, if so desired.

The second objective of session 5 was to design and build in the sky. To build above 200 meters in the sky, avatars must wear what are called flight or Ninja feathers. Without these feathers avatars cannot fly higher than 200 meters, however with the feathers avatars can exceed this limit. We learned that most sky builds are between 250 meters and 750 meters. The reason for going above 250 meters is to get out of sight range of people on the ground.

We then completed our first building project for this session, a sky build. To build in the sky you must have a platform to work from. We simply rezzed a cube and sat on it. We then raised it into the sky to approximately 500 meters. At this point we rezzed another cube and stretched it into a platform to stand on. This was the platform from which we would be able to build. Mali then asked us to mark down our coordinates, of the platform, so we could use them for our next project...the teleport system.

We then moved into our final objective and building project for the session...creating a teleport system between two locations. It was explained to us that there are many teleport options and scripts. This includes ones that teleport between 2 locations, between 3 or more locations, across SIMS, etc. The one we used allowed us to teleport between 2 locations. To create it we put the teleport script into the contents folder of the first object or prim located on the lower level. We then modified the script on the lower level teleport with the coordinates of the upper level platform. We then teleported to the upper platform and added the teleport script to the contents folder. We then modified the script by adding the coordinates of the lower platform or prim. One problem that a few of us ran into was not having the proper coordinates for our platform. A couple of times I teleported to open air and fell to the ground. I finally entered the proper coordinates to my platform, into the teleport script, and everything worked fine.

Construction Junction participants working on teleport systems. (photo taken August 19/08)

Thursday, August 14, 2008

Construction Junction Session 4: Integrating Scripst, Sounds and Animations into Your Builds

Session 4 of the Construction Junction workshop, again presented some new educational tools and taught some interesting new skills. The tool that we were introduced to was the Speak-Easy HUD. I may have mentioned it previously but during this session Mali Young provided each of us with one of the HUDS and showed us how it works. Some of the skills that we were taught dealt with scripts, audio clips, animations, and building.

The Speak Easy is a tool that creates a heads up display (HUD) when you wear it. It's purpose is to read text from a notecard and display the text in public chat, as if you were typing it in. This is a huge time saver when you have text that needs to by provided to a group and you do not have time to type it out. Our instructor from the Construction Junction workshop, Mali Young uses this HUD when she is providing instructions on a specific task. I find it very useful because the directions are clearly displayed and a history is available if needed.

The fist project that we created in this session was a student greeter. This is a useful tool that greets and provides objects to visitors when clicked. We first created a cube and put a texture onto it (I used my picture as a texture). For the student greeter to play sounds and give objects we needed to insert scripts into the contents folder of the object. The two scripts were the Play Sound Once script and the Notecard Giver script. A few simple modifications were required for our items to work with these scripts in our student greeter. I then added a 10 second audio clip (.wav), that I recorded in Audacity, to the contents of the object. This allowed for the audio clip to play when the object is clicked (very cool). The final item added to the contents of the student greeter was a welcome notecard. When clicked, the student greeter now played the audio file and handed out a welcome notecard.


Student Greeter created by Jeff Kurka. (photo taken August 14/08)


The second project we made during session 4 was a Rock that played sounds. This object is useful when you want sounds like birds or water playing in the background. We first made a rock from a sculpty prim. This is one prim that is sculpted into a shape to represent an object. A rock texture was then added to the object. Five bird audio files (.wav) were then added to the object contents. To make the sounds play a script called Sound (Random-string of same names) was added to the object contents. Again some simple modifications of the script were required to play the audio files that were added.


Rock that plays bird sounds (photo taken Aug. 14/08).


The third project for this session was a scripted ice cream cone. To make this object we first created the cone and then created the ice cream. The two objects were then linked so animations could be added. Before the animations, we added a script called Animator to the object contents. We then added two animations, one called ice cream eat and one called ice cream hold.


Ice cream anyone?(photo taken Aug. 14/08)

Wednesday, August 13, 2008

Construction Junction Session 3: Building Supplies and Groups

Our third session of the Construction Junction workshop showed me how little I know about building in SL. We began the session looking at a tool called a Prim Finder or Rezzer (shown below).


Mali Young, Jeff Kurka and other Construction Junction participants learning about a Prim Finder/Rezzer. (photo taken August 12/08).
A Prim FInder/Rezzer is a very useful tool that allows you to search through a variety of prim shapes and choose the one you would like to use. This is useful because you do not necessarily have to know how to create the shapes in order to build items out of the prim shapes the rezzer provides. Mali said that one can be purchased for approximately 250 Linden which comes out to about $1.00.

Our next agenda item was to play a game called
primtionary, which is a SL game that helps to develop and refine your building skills. The host IM's an object to be created by one of the game participants. That participant tries to construct the object out of prims while other members try to guess what the object is supposed to be. Once someone guesses...they win 20 Lindens and then get their turn at building.


The Construction Junction group playing
primtionary. (photo taken August 12/08).

In the past I have always struggled moving around objects in my inventory. As I am moving items from folder to folder, I have folders expanding and collapsing which make it difficult to put items exactly where you want them. Well Mali taught us a trick when working with inventory items. All you have to do is go into file>open new window and a second inventory window opens allowing you to drag and drop items much easier. Mali provided us with this tutorial by Torley Linden to view to help understand the process: http://www.youtube.com/watch?v=z19DHCrQVIM

Another trick we were shown is how to use inventory filters to find items in our inventory. Take a look at the following Torley Linden video to help understand the process:
http://youtube.com/watch?v=XLpcjhbQRdc

Our building project for this session was a material dispenser. It is a very useful object that has a script allowing it to give out items. For example I can put notecards, landmarks or other objects into it and when someone clicks on the dispenser it will give out the items. Mail uses it to give out all our supplies for each session. I put the latest version of the ECMM t-shirt into the dispenser and I might use it to give out the t-shirt. Shown below is the updated version of the ECMM t-shirt.


Updated version of the ECMM t-shirt
. (photo taken August 12/08).

Although this was a very informative and well organized session, I believe people are having difficulties understanding what chat to use. For example when I first arrived at the sky box we were using local voice chat. We were told to go over to group voice chat which worked fine. Many of the group members were initially using local text chat during primtionary but then the chat seemed to switch over to group text chat. This was confusing for some of us as we were trying to figure out what text chat we were to be using. Also when the speak easy HUD was used, the text chat transferred back to the local text chat. This was a little confusing for some as they did not know where to look for the instructions coming from the speak easy HUD. I understand certain chats need to be used for certain tools or in specific situations but it seems to be necessary to identify when chats are switched from local to group or vice versa.

Saturday, August 9, 2008

Construction Junction: Session 2 Where Do I Build?

When we met at the skybox on Prudentia island for the second session, it quickly became clear that SL was having technical issues. Some of the participants could not get into the grid, others were having difficulties talking or hearing the voice chat. Mali Young (our instructor) was impressive in the manner in which she handled these difficulties. She remained calm, cool and collective in dealing with the technical issues and you could tell she has had experience instructing in SL.

I see this being an issue when instructing groups in SL. Even though SL has recommended hardware to run the client and participate in the virtual environment, this does not mean everyone's computer system is running properly to provide an error free experience. How does an instructor handle the group when everyone has paid to participate and some are having technical issues and others are not? Should the instructor carry on or stop and try to deal with technical issues? As far as I can see either way can be a losing situation. However the instructor decides to handle these situations...I think it should be identified at the onset of the class so everyone understands what to expect and how it will be handled. I also believe some type of alternative system should be put in place for those having technical issues or not able to access SL during synchronous class time. This could be (as Mali has done) simply recording the session and posting it to a wiki. Whatever the process, it must be thought out and put in place because it will be a guarantee that technical issues will occur.

In session 2 we further discussed some building techniques and skills. We began creating our bags to hold our t-shirts. We worked with some of the tools like "hollow" to make the bag. We then began to work with textures to apply to the bag. The group then moved off the skybox, down to the land of Prudentia island where we were shown how to terraform land. We were also shown how to arrange trees and plants on our land. These are all very useful skills that do not seem that difficult but certainly take creativity and practice to get good.


Practicing terraforming and adding trees to land. (photo taken August 9/08).

Friday, August 8, 2008

Construction Junction: Session 1 Educational Design and Building

The Construction Junction workshop's first session, titled Educational Design and Building provided an opportunity for everyone to introduce themselves. We went on a tour of various educational islands in SL to see different design techniques being used to develop virtual educational environments. At each location we discussed what we felt the designer's purpose was in the build or virutal space created.

Once we got back to the skybox, on Predentia island, we reviewed some of the basic building skills required for the activities in session 1. The activities for this session are the creation of a t-shirt and a bag for the t-shirt. Shown below is my first attemp at making a t-shirt for ECMM. I am not sure if this will be the final product but it is a start.


First design of ECMM t-shirt. (photo taken August 9/08).

Construction Junction Workshop - Self -Directed Learning

After some time away from posting to my blog...I am back. I have been spending some time thinking about an updated design for the ECMM space on the U of S property in SL. One of the considerations is to include educational space designed for researching self -directed processes in non-formal learning environments. This design consideration has come up due to a SSHRC (Social Sciences & Humanities Research Council of Canada) research project titled Self-Directed Processes and Virtual Communities in Non-Formal Learning Environments. I am grateful to be a member of the team, as a research assistant, in this project being led by Richard Schwier, Dirk Morrison and Ben Daniel.

To learn more about theories, principles and skills in the designing of educational space in SL, I have enrolled in a workshop titled, Construction Junction - Educational Design and Building in Second Life. This is a four week workshop focusing on the design and building of educational environment in the 3D virtual world of Second Life.


Image retrieved August 8/08 from: http://constructionjunction.wikispaces.com

The design methods being used by this course are very creative. For example when I first signed up for the course I was sent an email telling me that I would be added to the Construction Junction group in SL. This would allow me to access the area on Prudentia Island in SL where the course would be held. The email also told me to go to Prudentia Island and choose a plot of land for myself where I would be allowed to build. When I teleported to Prudentia Island and turned on my property lines (view>property lines), I saw lines separating the land into plots. On each plot was a box (as shown in image below) that you could click to claim your plot of land to build on for the duration of the course.


Boxes for choosing land plot on Prudentia Island. (photo taken August 8/08).

The next post will discuss the Day 1 session titled Educational Design & Building.

Thursday, April 24, 2008

Subdividing Parcels of Land

I talked to Larry Pixel (Larry Johnson in RL) on Monday, April 21 regarding possible solutions to setting up permissions for different groups making use of the U of S property on teaching 6.


Larry Pixel, CEO of New Media Consortium (photo retrieved April 24/08 from: http://sl.nmc.org/author/larry/).

Larry suggested we subdivide the land into parcels to provide groups with increased access and permissions. Currently the U of S property on teaching 6 is deeded to a group called SLUG (Second Life User's Group). The officers of the SLUG group are the ones who control the overall management and permissions of the U of S property.

Subdividing parcels of land means that the large piece of land (e.g. U of S property on Teaching 6) is divided up into smaller parcels. The smaller parcel is then deeded to the group making use of the space (e.g. Snellgrove Gallery, ECMM, others).

The benefit of subdividing the land is that groups have control of their space. One of the main reasons groups require control of their space is to provide members with permissions to utilize tools and equipment owned by the group. Another reason (probably most important) is that each subdivided parcel receives its own media stream. Currently the U of S property is allowed one media stream but by subdividing into more parcels...each parcel can receive a media stream.

The negative aspect to subdividing into smaller parcels is that the prims of the larger parcel are divided amongst the smaller parcels. Therefore each smaller parcel will have a less prims allowed on the parcel. Larry recommended that we do not subdivide the U of S property into more than four parcels. Four parcels will still allow for a decent prim count on each parcel.

Saturday, April 19, 2008

Rearranging Buildings on Teaching 6

If you have recently been to the U of S property on Teaching 6 you will notice the Snelgrove Gallery 2 is now located on the spot where the previous ECMM building was located.


Snelgrove Gallery shown in new location. (photo taken April 19/08).

The soon to be reconstructed ECMM building will be located on the Northern tip of the U of S property on Teaching 6 (see image below).


New location of the ECMM building. (photo taken April 19/08).

SLUG (Second Life User's Group) will be meeting on Thursday, April 24 to discuss policies and permissions (among other things) for the U of S property on Teaching 6. Once some of these issues are dealt with we will begin reconstructing the ECMM building in its new location.

Friday, April 4, 2008

April Fools...I Wish!

On Tuesday, April 1, 2008 Felix Stringer (Frank Bulk-RL) played an April fools joke on us in SL...or so we wished.

Currently the U of S property in SL allows anyone to build on the land. This means the entire property acts like one huge sandbox. This is very inviting for builders in SL to come to the U of S property and practice their building skills (not necessarily a bad thing). However, one of the problems we do run into is inventory items being left lying around the property.

Inventory items can be returned to their owners through a couple of methods. The first is for people with appropriate land permissions to send the items back to the owner. This may be a little tedious for certain individuals having to do this on a regular basis. The other method is for the land to be set to return items to owners after a specific amount of time. This is more than likely the best way to keep the land clean, however before this is done be sure items that are supposed to be on the land are set so they are not returned.

The problem we ran into on the U of S property is that various groups were building structures and organizing spaces. For example Educational Communications and Technology's ECMM building, Kev Juno's College building and Dependent Binder's Art Gallery. All these structures were deeded to their own groups and the property is ran under the SLUG (Second Life User's Group). When Felix Stringer decided to set the land to return all items to their owners after a specific amount of time...all items on the entire property were returned. This included all the structures and objects that were supposed to be on the property. This lead to pretty much the entire property being cleared.


U of S property cleared after inventory items returned back to owners. (photo taken April 3/08).

On April 1, when Felix told us that the land was cleared...we were hoping it was an April fool's joke. He assured us it wasn't and when we went onto the land we saw the inventory returned results. We may have learned how groups and deeds work in SL the hard way but as Slugger Sosa (Rick Schwier-RL) said to me, "But I guess this is a terrific example of life on the bleeding edge."

Thursday, April 3, 2008

ECMM 802 Tour

A tour in SL was held with Rick Schwier's ECMM 802 graduate class on Monday, March 31. We incorporated a few of the things we learned from the EC&I 831 tour.

For this tour we used a different tour HUD supplied to us from Eloise Pasteur. The setup for this tour HUD was much easier. To add locations to the tour you simply wear the "Tour Leader HUD" (shown below), go to the locations and click on the "Add" button to include the location.


Jeff Kurka wearing the Tour Leader HUD (photo taken March 31/08).

A very useful feature about Eloise's tour HUD is that it comes with a "Tour HUD Giver" (shown below) that allows participants to click on to receive the tour HUD. The HUD giver is designed to give out other objects along with the tour HUD if required. This is very useful if you need to provide participants with notecards or objects for the tour.


Green pyramid Tour Hud Giver (photo taken March 31/08).

The "Tour HUD" (shown below) that the participants receive from the "Tour HUD Giver" looks different than the "Tour Leader HUD".


Wearing Tour HUD (photo taken March 31/08).

Once the leader and participants are both wearing their HUDs, to teleport to the first location the leader clicks on the "TP" button. Each of the participants wearing the tour HUD receive a map of the next location and a teleport button. When the participant clicks on the teleport button they teleport to the next location in the tour.

Eloise's tour HUD worked very well on all the computer systems the participants were using. It moved everyone along nicely as a group to each location. If a participant got lost they either clicked the rope on their HUD to receive the last location or the "i" to IM the group leader their location. The group leader could then go and retrieve the participant.

One problem that did occur is that the HUD, on one occasion, TP us to the wrong location. Not sure why but when trying it again it TP to the proper location.

A recommendation (thanks Kev Juno) that we did try for this tour was using the "buddy system". I would use it again...it worked well. Each participant simply partners with a buddy and they help each other during the tour. This way if one gets lost the other can communicate with them and TP them to the proper location.

Tuesday, March 25, 2008

WebMon 2.5

The WebMon 2.5 has been added to the 1st (middle) floor of the ECMM building.


Webmon 2.5 in the ECMM building (photo taken March 24/08).

The WebMon 2.5 tool is used in SL to launch web addresses. You simply load it with specific web addresses and it will launch those websites for the user. This is a very useful tool when you want users to view specific web pages from SL.

To see how the WebMon 2.5 tool works go to the ECMM building.
To learn more about the WebMon 2.5 go to the Buckley Barkley web page.

Slider 3.0

I recently added the Slider 3.0 created by Bucky Barkley to the 1st floor (middle floor) of the ECMM building.


Slider 3.0 tool in ECMM building (photo taken March 24/08).

This tool is useful for viewing images and giving out items. To use it you simply click on the screen and forward and backward arrows with a green box between the arrows will appear. The arrows let you move forward and backward through the slides and the green box gives out items related to that specific slide. For example I can be viewing a slide of a location in SL and click the green box to receive the landmark.

Slider 3.0 gives out a number of items including:
  • Landmarks
  • Objects
  • Pictures or textures
  • Web pages
To see how the Slider 3.0 tool works go to the ECMM building.
To learn more about the Slider 3.0 go to the Buckley Barkley web page.

Friday, March 14, 2008

Build It and They Will Come

As quoted from the movie Field of Dreams, "Build it and they will come" and wow...did they show up! Approximately 20 University of Regina students from Dr. Alec Couros' ECI 831 course participated in a tour of Second Life.


ECI 831 tour group from U of R. (Photo provided by Dr. Richard Schwier, March, 2008)

This was my first opportunity to organize and lead an official educational tour for a group in SL. Thanks to Dr. Alec Couros and the entire group for providing me this opportunity in which I learned a great deal. I certainly appreciated everyone's patience. I am also grateful to Kev Juno (Kevin Lowey-RL) and Slugger Sosa (Dr. Richard Schwier-RL) from the U of S for their assistance during the tour.

To start the tour participants gathered in the theater area of the ECMM building (shown above) to receive instructions and objects including a tour HUD, notecard and participant list. During the tour we visited five educational locations including:
  • Information Communications Technology (ICT) Library
  • Georgia State University
  • Discovery Educator Network (DEN)
  • Teacher Network Center
  • International Spaceflight Museum
The tour was organized on a Tour HUD (Heads Up Display) which is worn by each participant to provide details and a landmark for each tour location. When wearing the HUD, it is displayed in the SL viewer interface of each participant (shown below).


Tour HUD shown in upper-right of viewer interface (photo taken Mar. 12/08).

As in real life...Second Life includes strategies and methodologies for delivering instruction and managing groups. The problem is coming up with strategies, methodologies and proper group etiquette in a 3D digital world where much of this is still being discovered.

The first issue that we had to deal with was helping newbies understand movement and camera controls. Many people in a group like this are new to SL and therefore a plan should be put in place to support these individuals. We did not really have a plan in place but Kev Juno ended up being our support person, helping many of the newbies struggling with their avatars.

The second issue was communication. As a presenter, voice is very nice and easy to use. The problem I ran into was not everyone could hear voice. I therefore used voice but also had to text with those not able to hear voice. To solve this problem I would use voice but have a helper along to communicate through text with those unable to hear voice. If a helper is unavailable then I would use only text chat with the entire group so no one feels left out.

The third issue was handing out objects (HUD and notecards). I had the objects in my inventory and decided to hand the objects to each avatar. Bad idea!! This took a long time and created absolute mayhem. To solve this issue I would construct an object containing the items that needed to be handed out. This object could be scripted to hand out the items to avatars when touched. Using this method would allow for the object to be placed in a location where members of the group could touch it and receive necessary items.

The final issue I will mention is computer systems. For some reason people using certain types of Macs had problems with the tour HUD. luckily I had a backup plan for this and created notecards with the landmarks that could be handed out to these individuals.

Time and experience will provide us with best practices required to effectively use digital platforms like SL. Much like RL careful planning is necessary for creating successful events.


Friday, March 7, 2008

Collaboration May Be The Answer

A meeting was held at the ECMM building in SL on Thursday, March 6/08 with members from the University of Regina and University of Saskatchewan.


In-world meeting between U of R and U of S members discussing the potential of SL (photo taken Mar. 6/08).

This meeting was to discuss the educational value of SL. The U of R is currently looking at SL to research the educational potential and possibility of developing a presence in-world. The meeting allowed members from the U of S to share their SL experiences, to date, with the U of R group.

The Educational Communications and Technology group from the U of S expressed an interest in collaborating with the U of R members. The ECMM building in SL, developed by Ed Comm & Tech from the U of S, could be used by both groups for research, education and capacity building purposes.

A collaborative effort would provide the small groups from both universities with the ability to:
  • develop an effective community of practice in SL
  • produce an environment full of activity and rich learning experiences
  • participate in a more cost effective approach to researching SL
  • increase interaction between institutional staff and students
Maybe I am dreaming or maybe even out of line...but oh well I will say it anyways. Just imagine a collaborative space where you can walk around a SIM and participate in classes from the U of S, U of R or even other Saskatchewan post-secondary institutions represented on the SIM.

Sunday, March 2, 2008

Introduction to SL Resource Being Developed in Moodle

A resource titled, Developing a Presence in the 3D Digital World - Second Life (log in as a guest user) has been where I have dedicating most of my recent time. This resource has been developed in Moodle as a tool to assist new users to understand and get into Second Life.


SL Moodle resource (image retrieved March 2/08 from: http://www.cumberlandcollege.sk.ca/abe/course/view.php?id=30)


I believe many of us are comfortable with the current web. For example we understand how to launch a web browser and maneuver throughout the web. This is why I believe a tool such as Developing a Presence in the 3D Digital World - Second Life created in the current 2D web, in which users are comfortable, is important. This allows for users to learn about the 3D Digital World in a familiar, comfortable setting and not be overwhelmed in the 3D environment. This resource gradually moves users from the current 2D web format to being fully integrated into the 3D digital platform of Second Life.

This resource currently has six sections, each section is broken down further into specific topics. The current section titles include:
  1. Understanding Second Life
  2. Creating your Avatar in Second Life
  3. Second Life Performance Setup
  4. Second Life User Interface
  5. Communicating in Second Life
  6. Moving and Getting Around in Second Life

Sunday, February 3, 2008

Educational Tools from THiNC SL

I have been looking in SL for a scripted book, when you touch the book the pages turn. I have finally found the scripted book (shown below) at THiNC SL.


THiNC Book 2.0 (image retrieved Feb.3/08 from: http://thincsl.com/category/products/)
The THiNC Book is an extremely versatile educational tool in SL. The book has full animations and sound including opening, turning pages and closing the book. The educational value is the ability to fully modify color, textures and size of the book. To add your own pages you select the book and edit, then go to the contents tab and add your textures. These textures will become the pages of the book. Once your book is made you can transfer it or leave it around for everyone to look at.

When searching for the THiNC Book, I found another useful tool that works in conjunction with the THiNC Book. The THiNC Printing Press (shown below) allows you to create exact replications of your THiNC Book for unlimited distribution.


THiNC Printing Press
(image retrieved Feb.3/08 from: http://thincsl.com/category/products/)
The THiNC Printing Press allows the author of a THiNC Book to publish exact copies of their book with no modify but copy and transfer rights (if given by author).

The third item I found from THiNC SL is the THiNC BiG Display System (shown below).


THiNC BiG Display System
(image retrieved Feb.3/08 from: http://thincsl.com/category/products/)
The display system is an educational tool that displays images on up to four separate screens at one time. The images are loaded into the system's inventory (contents folder). The images can then be controlled as to which screen displays each image. I see this tool very useful for independent or self directed learning.

If you would like to see any of this equipment in action, drop by the ECMM building on the U of S property in SL and I will be glad to show you.

Tuesday, January 29, 2008

Formal Presentation Area Created for ECMM Building

A formal presentation area (shown below) has been created on the first floor of the ECMM building in SL.


Formal presentation area on first floor of SL-ECMM building (photo taken Jan. 29/08).

The presentation area consists of theater seating and a podium. The theater seats are scripted to lower and raise the sitting section of the seat when touched. The podium is scripted to provide the avatar who is speaking at the podium with movements as if they were speaking. The podium is also mic'd to extend the voice or text distance of the avatar speaking at the podium.

Another addition to the fist floor of the ECMM building is the espresso bar (shown below).


Espresso bar on first floor of SL-ECMM building (photo taken Jan. 29/08).

The espresso machine really works! If you click on the espresso machine...it will steam, and make espresso. Be sure to watch the gauge and listen to the sound of the espresso machine while it makes your espresso. Next touch the Demi Tasse (cup) and it will be put into your inventory. Go into your inventory and wear the Demi Tasse and your avatar will be sipping a hot cup of freshly brewed espresso...enjoy!

If espresso is not your thing you can get a glass of water on the third floor in the board room. Look around you will find it.

Office Space for SL-ECMM Structure

If you teleport to the second floor of the ECMM building in SL you will find office space. The ECMM office space consists of desks (shown below) but these are not your ordinary desk.


Dr. Rick Schwier's new desk on the second floor of the SL-ECMM building (photo taken Jan. 29/08).


These desks include two computer monitors that can view both slides and video. Another nice feature of the desks is the Online Detector. This feature tracks the in-world presence of the avatar who owns the desk. If the avatar is in-world a display identifying the avatar is online will be hovering over the desk. If the avatar is online but not at their desk, a visitor can page the owner from the Online Detector connected to the desk. I see this useful if professors hold office hours in-world. Their students can see their online status and page them if needed.

Saturday, January 26, 2008

Reception Kiosk for ECMM Building

A reception kiosk (shown below) has been added to the ECMM building in SL.


ECMM reception kiosk (photo taken Jan. 26/08).

The reception kiosk has been added to serve some interactive purposes. When you walk towards the reception kiosk you will be welcomed to the ECMM building through an instant message. This message will then ask you if you would like a gift. At this point you will be able to accept or decline the gift. If accepted you will receive a notecard providing information about the ECMM building. You will also receive a landmark of the ECMM building in SL. All this is done through a greeter (shown below) that was recently picked up from Trinity Vanmoer Designs.


Gift Greeter designed by Trinity Vanmoer Designs (photo taken Jan. 26/08).

The Gift Greeter scans a set distance every certain number of seconds for new avatars. If a new avatar is found it will provide the avatar with the welcome message and gift. The Gift Greeter also serves another function for the ECMM building. It keeps a list of visiting avatars and provides a list of visiting avatars to it's owner. This will be very useful to keep track of visitors to the ECMM building in SL.

Another interactive tool you will find on the reception kiosk is the Business Card Giver (shown below).


Business Card Giver (photo taken Jan.26/08).

The Business Card Giver was purchased with the kiosk from 3D Office Solutions. When an avatar touches the Business Card Giver, a notecard is provided including whatever information is put on the notecard. In this case the notecard provides information on the Educational Communications and Technology administration, faculty and teaching staff.

The final interactive tool on the reception kiosk is a computer monitor (shown below).


Computer monitor on reception kiosk (photo taken Jan. 26/08).


The computer monitor on the reception desk is capable of showing slides or streaming video. It could be used in the future to stream an introduction video of Educational Communications and Technology.

If anyone has any suggestions or ideas as to what could be included in this or any other space of the ECMM building...please let us know. This is a collaborative effort and hopefully in the near future this space will be inhabited by many ECMM students for a variety of purposes.

Designing an Interactive Sign for ECMM

When you walk up to the ECMM building in SL, you will notice a new sign (shown below) in front of the building.


Interactive sign in front of ECMM building (photo taken Jan. 26/08).

The display sign was purchased to provide information about ECMM. The sign has space for eight bits of information. Currently two panels are being used to provide interactive bits of information regarding ECMM. When the first panel is clicked it delivers a notecard (card providing information in SL) welcoming the visitor to ECMM and provides some background information. The second panel, when clicked, launches the ECMM webpage in an external browser.

This sign was not designed to be interactive but with help from Kev Juno (he provided me with the script) the sign panels were textured with PowerPoint slides and the script to either deliver a notecard or launch a webpage was added to the contents folder of the panels. Thanks again to Kev Juno for explaining where to put the script in order for it to work properly. This really was not that difficult, for a non-techie person like myself, once I was told how it works and given the script. The script has to be modified slightly to deliver a specific notecard or load a specific webpage but, once shown, is not difficult to do. If anyone is looking for the script or needs to be shown how to set it up, I would happily "pass it on" as Kev Juno has to me. There are six more panels to fill, so if anyone has any ideas as to what we should put on them, please let me know.

The University logo has been added to the sign in SL. I am not sure if this logo should be used at this time in SL. Does the University need to approve the use of the logo in SL or can we go ahead and use it?

Monday, January 21, 2008

Installing a FreeView Player in the ECMM Board Room

I installed the FreeView free to copy, open-source Streaming Video viewer in the ECMM board room. This video viewer, developed by CrystalShard Foo, includes features such as media controls for video streaming, web-based movie listing, picture viewer and more. A FreeView SL help guide is available at: http://www.slguide.com/help/


ECMM
boardroom including recent additions of table, chairs and FreeView streaming video viewer (photo taken Jan.21/08).

The FreeView video viewer was reasonably easy to setup. The first step was to rez it from my inventory into the boardroom. The size of the screen was good so I did not have to resize it but that option was available is needed. Next I edited the placement of the screen by rotating it so it would fit flat against the wall and positioned it against the wall at the appropriate height.

Once it was positioned properly on the wall I opened the notecard with setup instructions. The instructions were easy to follow but I did run into a couple of problems. First, I want to have members of the ECMM SL group (now created) able to use the FreeView video viewer at their convenience. To do this a ECMM group had to be created and the FreeView video viewer had to be deeded to the ECMM group. This will allow for members of this group to use the viewer but be sure you have the ECMM group profile selected on your avatar so the viewer identifies you as a group member and provides you with the media controls.

The second problem I ran into is that the ECMM group is not currently set with permissions on the U of S property in SL. Therefore the FreeView viewer will not work due to the fact that the ECMM group, which the Freeview viewer is now deeded, does not have permissions on the U of S property. Hopefully Frank Bulk will be able to sort this out for us and we will be streaming video soon.

Sunday, January 20, 2008

A Dilemma - Construct or Purchase the ECMM Building

A dilemma that took a long time to make a decision over was whether to construct or purchase the building for ECMM. At the beginning of this whole process, my thought was that most people constructed their own objects (buildings, furniture, etc.) for their spaces. This concerned me a little (ok alot) because of the detail in some of the wonderful structures in SL. For example the real life College Building (shown below) is being constructed by Kev Juno (Kevin Lowey-RL) on the U of S land in SL (anyone confused yet?).


Real Life College Building. Image retrieved on Jan. 20/08 from: http://scaa.usask.ca/gallery/uofs_buildings/

The reproduction of the College Building (shown below) will take Kev Juno days if not months of detailed construction to reproduce in SL. Once complete it will be a wonderful reproduction of a real life building in SL. To attempt a task such as this, one would want to be sure they have advanced building skills.


Jeff Kurka with Kev Juno looking at the College Building Kev is reproducing in SL (Picture taken Jan. 20/08).
I do not have building skills like Kev Juno so I began to use my creative skills and problem solve a solution to this dilemma. As I researched buildings in SL, I quickly realized buildings and many other objects can be purchased for a very reasonable amount of Linden Dollars (SL's unit of trade). The smallest amount of Linden's I was able to purchase was 585L for $2.50 US.

I eventually went to Hydro Homes in SL to purchase the new office structure for ECMM. Purchasing a building was like purchasing anything else in SL. The item is put into your inventory and from there you can rez (make viewable from your inventory) it onto your land. Shown below is the new Building for ECMM. Come over and take a look at our new structure, we would be happy to give you a tour.


The new ECMM building on the U of S Campus in SL (Photo taken Jan. 20/08).

ECMM Officially Under Constrution

What an exciting time in SL, the ECMM space on the U of S property is officially under construction.


ECMM Construction site (Picture taken Jan. 19/08).

The fist step in developing the space for ECMM is constructing the foundation in which the building will sit. I have decided to construct a cement foundation. To do this I created a bunch of cubes linked together and applied a concrete texture to the cubes. This was not a difficult process but you will have to know how to build a cube, size objects, copy objects, move objects, link objects and apply textures to objects.


Jeff Kurka constructing the cement foundation for the ECMM building (Picture taken Jan. 19/08).

Learning How to Build in SL

As in RL (Real Life) to be able to construct objects in SL (Second Life), basic building skills are necessary. So to begin developing the space for ECMM, I will need to lean how to build objects and work with textures.

To learn how to build in SL, I suggest you go to the Ivory Tower Library of Primitives, http://slurl.com/secondlife/Natoma/204/70/25/. The Ivory Tower is a location in SL that consists of resources, where avatars go to learn how to build. Once arriving at the Ivory Tower you will move through stations, each providing a tutorial on a specific building topic. The tutorial instructions are provided on notecards that can be kept in your inventory for future reference.


Jeff Kurka learning how to build at the Ivory Tower Of Primitives (Picture taken Jan. 17/08).
The interface in SL provides highly flexible building tools, where learning basic building techniques is not that difficult. The interface allows you to create geometric primitives (prims) that can be manipulated. Basic prims such as cubes, triangles, spheres and cones can be positioned, sized, colored and textured to create objects.

Unless your techie skills are advanced (unlike mine), you may want to learn the basics of building first, practice second and then proceed with more advanced skills. Through this process I believe I was able to learn basic building techniques but by no means do I feel that I am an expert builder.